Search This Blog

Showing posts with label crafts. Show all posts

Monday, January 16, 2012

a wooden craft

We made this cute craft in November for super saturday. I wanted to post it earlier but we gave it to our Young Women for Christmas so I had to wait.


It took us all day to paint and another day to sand. The process was kind of ridiculous. If I would've known about the time involved I would've chosen a different project.
We had to choose three different colors of paint for each board. One for the letters, one for the background and one for underneath.
The underneath layer was meant to show through after the sanding, but we found that even after we'd sanded it didn't show through. So I thought this step was a waste.
The first step was to paint it with a shine gloss to give it some texture. Once that dried we painted the under layer, the color for the words (two coats). After that dried we put the vinyl on then painted the under layer. (two coats.) Then after that dried we did the background color, in my case red and blue. (two coats)


I made one red and one blue. 
Next, we peeled off the vinyl then sanded.


I really liked the finished product. A little worn and vintage. A ton of work, but cute in the end.

Tuesday, October 4, 2011

Conference Craft

My sister and I decided to do a craft during the Priesthood session of conference. We wanted to do something Fall/Halloween and decided on wreaths. Since her door is dark and mine is light we chose different wreaths. There were so many cute options! I literally had Ryan choose it for me because I couldn't decide. It was so easy and only cost $11. I found mine here

Supplies
-16 in foam wreath
-thick yarn (i bought wool)
-yellow and black felt
-thick card stock

First, I wrapped the yarn around around the wreath. The foam wreaths are great because the yarn sticks right to it.


I traced the bat found here onto the cardstock then cut it onto the felt. 
I cut out two eyes from the yellow felt and used a bowl to trace for the moon. I hot glued them on and that's it!
Toni's was much harder and more complicated because all we had to go off was an image on etsy. We looked hard at how it was made and ended up getting so frustrated. We wrapped and unwrapped it three times, had to run to the store for more gauze, then realized we didn't even need it, but hers will be so cute when finished, and it didn't cost $120 like you could buy it on etsy.


Enhanced by Zemanta

Monday, September 12, 2011

Become.com

Have you heard of become.com? I just came upon it and it's the perfect site for Christmas shopping. (104 days!)
If you're searching for a specific item it finds the best deal online.


For example: decorative bulletin boards . 
You can filter by store or brand 


large throw pillows


leather backpack purses


Try it out and let me know what you think!


Enhanced by Zemanta

Saturday, May 7, 2011

April Craft-Starburst Mirror

My sister got the idea for our craft from this site. It seemed pretty easy but because of a few hiccups it took a really long time. It calls for wooden plant markers that are supposed to be available at nurseries, but all they had were plastic ones. So we ended up buying craft sticks and we had to cut the edges to make points and sand them all down. That took hours itself. Also, we didn't have flat skewers so we used round ones.


Supplies Needed: 
  • Ikea Bjurön plant glide
  • 2 dozen 5-inch wooden plant markers (available at nurseries)
  • 2 dozen 5-3/4-inch wooden plant markers (available at nurseries)
  • 2 dozen wooden skewers (with two flat sides)
  • 7-inch round mirror
  • silver spray paint
  • wood glue
  • wooden tooth pick
  • sawtooth picture hanger
  • Con-Tact paper (color doesn’t matter)
  • newspaper or drop cloth
  • paper towel
  • books that are the same thickness as the plant glide
Tools
  • hammer & nail
  • small sponge paint brush
  • scissors
  • wire cutters
  • pencil & ruler
  • sanding block & fine sand paper


It was hard to keep the kiddos entertained and away from the cutters and sticks.


We covered the mirror with contact paper then glued it to the plant guide. After we got the wood cut to size we started gluing them on.

We gave the glue time to dry then flipped it over and got to work on the backside.

I then attached a sawtooth picture hanger on the back.
Some of the skewers fell off from transporting back to my house.  So after everything was glued back on I spray painted several coats, removed the contact paper, and hung it. Because of all the pokey edges there isn't really a place to pick it up so my sister had the idea to tie some string around it and hold it that way. It was a life saver! And made hanging it a breeze. Voila!


Wednesday, March 30, 2011

March Craft

Since we missed February's craft day Tara and I did one last week! We got the idea from Martha Stewart.

Items Needed:
-ruler
-paper
-shears
-coffee can
-twigs
-hot-glue gun
-raffia

We got our cans and wrapped them in brown paper. I went to Wheeler Farm and gathered lots of branches. We used that masking tape line as a measuring device so we could cut each twig to size. As i started gluing the twigs they didn't work very well since they weren't straight. My dad had just cut down some tree branches so we went out back in the dark with our flashlights and used my dad's HUGE shears to cut some perfect straight branches.
 I glued each twig on...


tied some raffia...
woila! Tara bought a bunch of flowers for another craft project, and they made the perfect arrangement.
so happy!

Monday, January 10, 2011

January Craft

 I didn't do craft month last month; however, my sister did this and gave it to me for Christmas. We got married in the Jordan River Temple, in fact all of my sisters did. Isn't it gorgeous!? We haven't hung it yet but it will go right above our mantle. 
We got together Saturday and thanks to The Tortoise and the Hare blog and Tatertots and Jello, did this:

 We got the paper for .19 each at Michael's
 The marbles were 2.50 per bag
Glue + Dollar store frames
Total project = about $8.00
They were so easy and fun to make! 
After crafting my sister took me to Cherry Lane Keepsakes . It's the cutest little boutique in Provo. They have stuff everywhere! Jewelry, purses, hats, decor, clothes. We had fun trying on all the crazy hats.


(I have that red mirror in the background by the way, but I did not spend $160 on it, thank goodness. Seeing it made me feel good, like I have some taste)


Monday, December 6, 2010

My only Christmas decoration

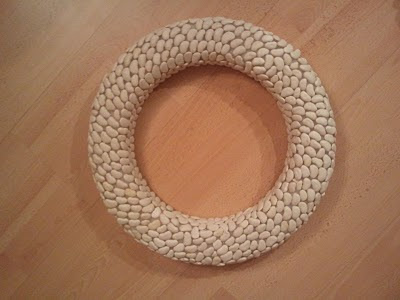
My sister and I have decided to get together once a month for craft night. We got the idea for these wreaths from this blog and made them last month. Mine is made out of Lima beans and Toni's with nuts. It took us hours but we love the unique feel of them.
Glueing

Halfway point..

Toni's

Mine

Toni's hung

Just for fun ;)

Mine!
I wish my door was a different color, maybe I'll spray paint it dark brown so it's looks better..

For some reason Ryan and I haven't put up any Christmas decor yet. It's a pain to get our tree up and all our decorations from storage, so this is it folks!

LinkWithin

Related Posts Plugin for WordPress, Blogger...